Saturday 31 May 2014

Altered clock

Very quick post as this is a very late entry for The Sunday Stamper Challenge which this week is 'change' .
I'll be back tomorrow with more details but here is my altered clock...


Touch of steampunk. Thanks for stopping by

Thursday 29 May 2014

Journalling

Bit different to last few posts (already said I like trying things out!) .....This is my entry for Darcy journalling month 4 over on the Paperartsy blog. As I explained last month I adapt it to one page in my journal.


Here are some of my steps, for more guidance and explanation see original post link above.


Liked the tissue paper flowers


For the next few stages, really thought I'd lost it...but just kept going


Liked the paint drips but wiped them back a bit before they dried as I'd got carried away. 


Really like the material element, it wasn't muslin but had fun fraying it as much as I could. Also added some more teal green at this stage.


Grunge paste through flower stencil, nearly there


Like the layers and textures created, still not sure about the colour ratio....but can always go back.
I am really enjoying trying out Darcys techniques each month and just going with it. Thanks for letting me share this with you. See you in month 5!

Tuesday 27 May 2014

Pink Gingko

Firstly, can I just say a big thank you for all the lovely comments left on my blog recently, I've been quite astounded, what a lovely bunch of creative people you are out there.

Anyway without further ado Pink Gingko....


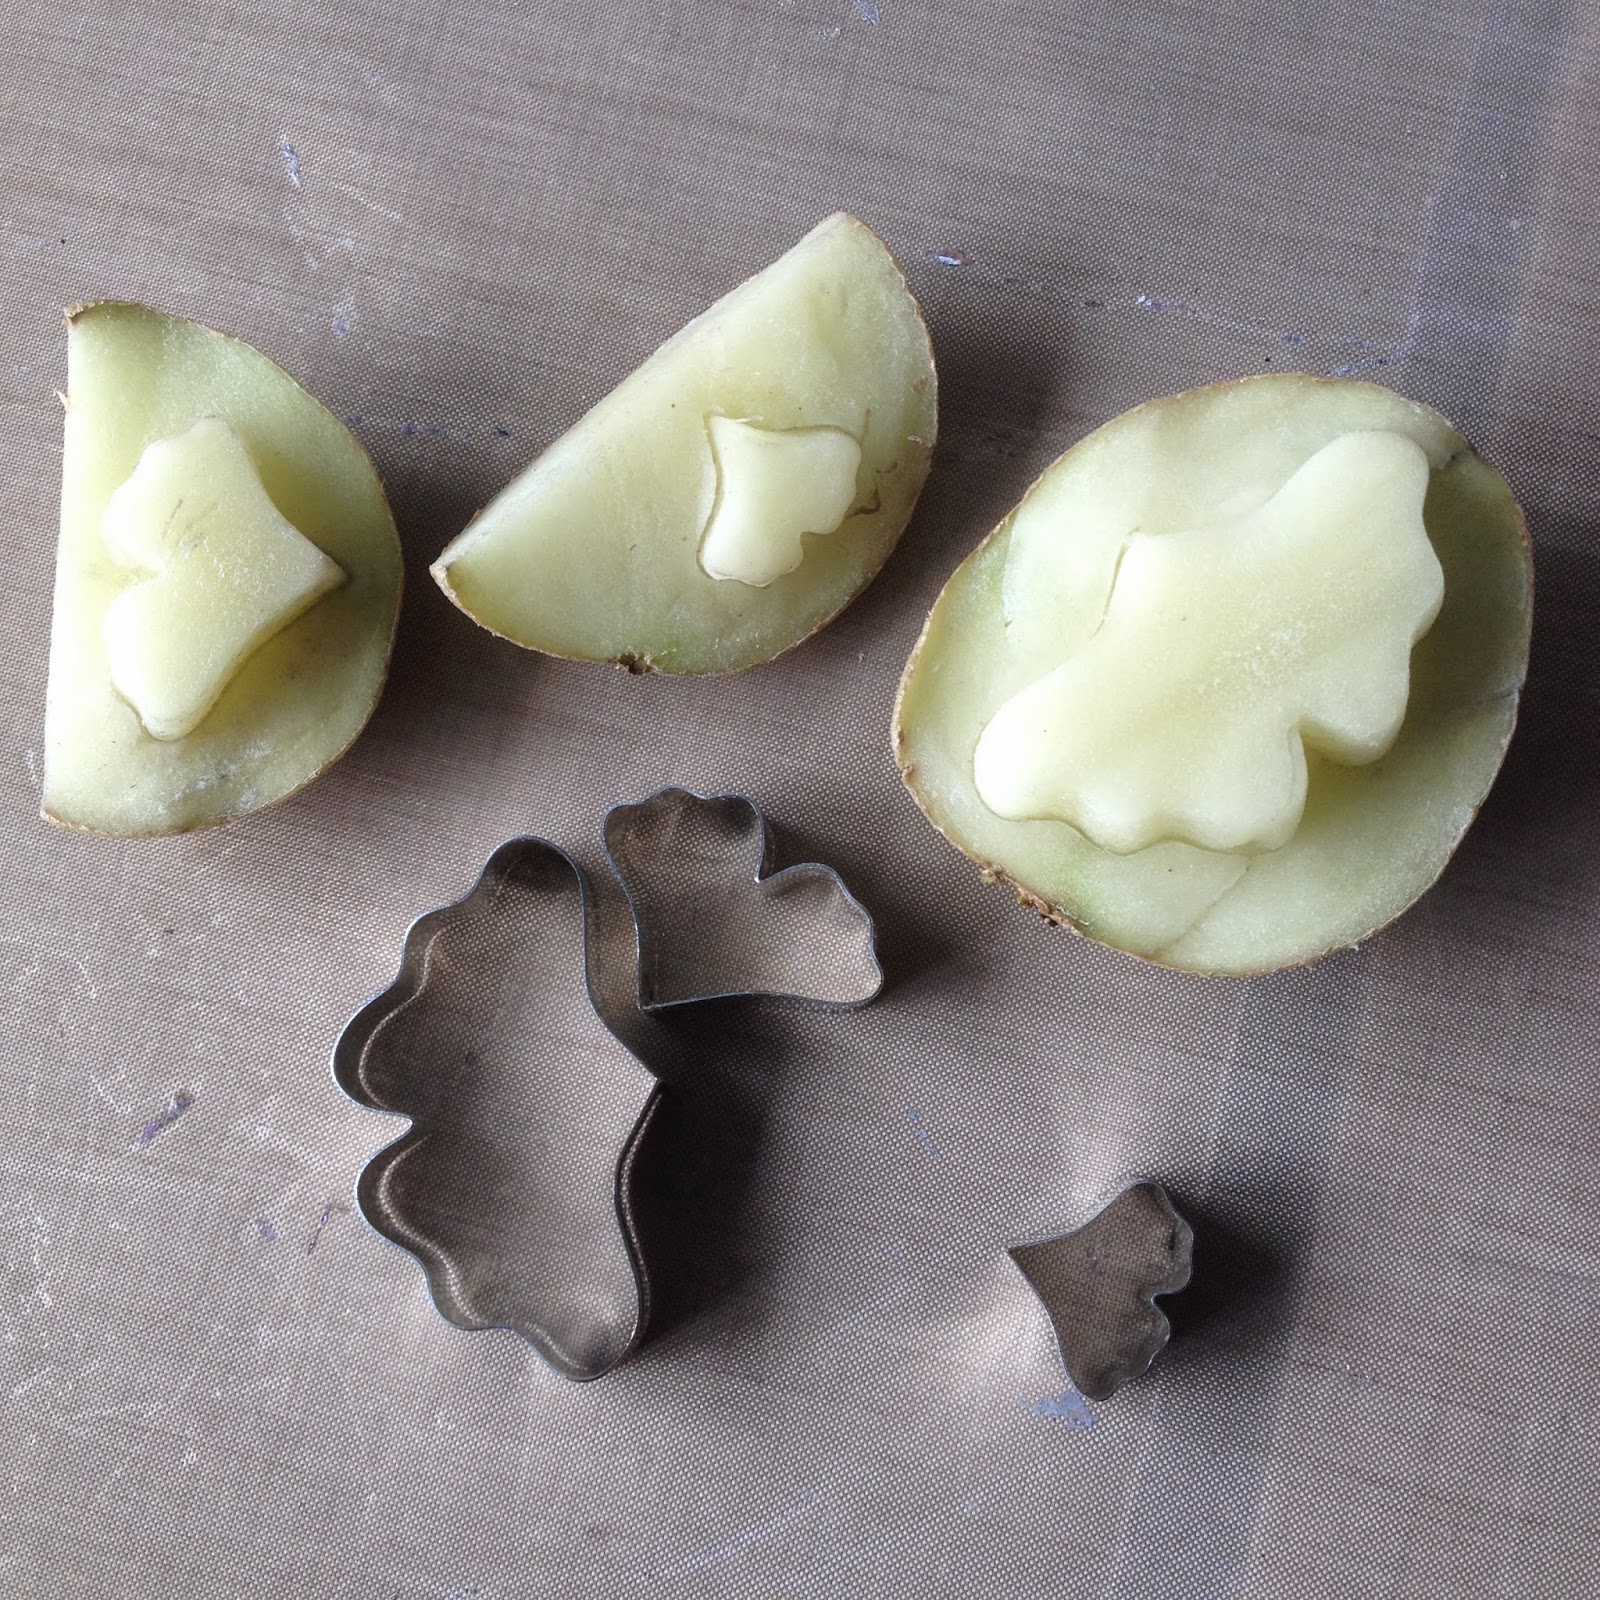
Craft Stampers 'Take it Make it' challenge this month is to include potato printing! I don't have any lino cutting tools so after a bit of a think I dug out some Gingko leaf cutters I had from when I made sugar flowers (another occasional creative life). I thought they would work for petals of a flower. Worked really well placing the cutter in the potato and then cutting away the outside.


I'd originally thought of California poppies in red and orange but the paint I used didn't work for me so after a few attempts, I ended up using some Luminarte acrylic silk glaze in 'Love Struck' and Ginger flower' (it has a lovely shimmer). As you can see the the potato started to dry out and crack which I then enhanced to look like veins in the petal.


I stamped the large paler petals first, then masked them off whilst I used the sequin waste stamp from The Artistic Stamper as a background. I've used antique linen DI and before stamping just softened the edges of the impression. I then added the remaining flowers, once dry I drew in the stems and veins in black and added a few gold veins to the larger flowers. The background is DI with a little old paper and tiny bit of walnut stain around the edge and some water spritzing. 


The sentiment is from a much used and loved Lin brown set and I felt the font lent itself to placing centrally at the base in the style of old prints of flowers with the botanical name at the bottom. The shimmery colour doesn't quite show up but hopefully you can see the texture. I did enjoy doing this though potatoes can be a bit difficult to hold properly for stamping! 
I am also entering this in the Artistic Stamper creative team blog challenge  'In the Garden'  and Country View crafts challenge 'Natures Glories'. Thanks so much for visiting. 

Friday 23 May 2014

Tiny Tin...take 2

Yes, when I made the first  tiny tin I already had an idea for a butterfly themed second one...add in the CC3C technique of distress glitter and the 'Sunday Stamper Challenge' of Brown and Blue and here's the result.


Apart form the touch of blue to lighten the project I wanted to keep to neutral tones so I've used pumice stone, vintage photo and black soot distress glitters. For the kraft glassine flowers I've used the 2 smallest sized tattered florals die. After scrunching up, I used touches of the 2 distress paints below and brushed with perfect pearls. Hopefully you can see the various stages of the flowers below.


The movers and shapers butterfly is cut from clearly for art modelling film, a butterfly stamped on in black and I just used glitter on both sides (no paint or ink) so it would still have transparent areas. I then heated the butterfly to mould it. The smaller butterfly inside was stamped and then scissor cut.


I've used chit chat stickers and remnant rubs inside and outside. To add some extra reflection inside the base as it's deep, I used a piece of very thin extra sticky tape (approx 1/8th inch) just inside the rim and sprinkled it with more pumice stone glitter. 


As well as the Sunday Stamper Challenge which I have linked above, I am of course entering this in Compendium of Curiosities 3 Challenge, which this month, as it's an even numbered challenge is sponsored by 'The Funkie Junkie Boutique'.

I haven't any more tins, tiny or otherwise at the moment  and although I have really enjoyed making them they can be quite fiddly and time consuming so I will be quite happy making something a bit more straight forward......well more normal size anyway! Thanks for looking in.

Tuesday 20 May 2014

Frilly and Funkie Challenge...Art

This submission is definitely inspired by Sue Carringtons 'Home' piece HERE on the 'Words,Words,Words challenge, I think it fits into funkie but not sure it fits into shabby chic/ vintage?...anyway I was inspired by the wonderful crackle finish and colours of the original piece.


I hadn't used my Wendy Vecchi crackle finish, so thinking that you don't need much I spread it very thinly and instead of lovely large crackles, I got very a very fine crazed effect (not complaining though).


Just meant I needed to go in a different direction.


I'd originally thought I'd make a lovely crackle frame with maybe a couple of embellishments and a word in the middle but I did struggle with trying to show the lovely crazed texture without it looking too plain or totally hidden by embellishments. I made some textured butterflies but they will be used for something else now as they just didn't look right. In the end I picked an open stamp and simple chunky letters. For the background to the words I've used the Wendy Vecchi translucent paste spread over the TH 'shatter' stencil. I'm happy with the finished piece and very impressed with the WV pastes! I was going to say it's not my usual style but I am beginning to think it's quite eclectic anyway! Thanks for stopping by.

Sunday 18 May 2014

PaperArtsy 'Monochrome'

Over on the PaperArtsy blog this week I have been inspired by Karen Baker to produce a monochrome altered frame. I really wanted to try out the metallic glaze over a crackle finish. Here's my entry for this weeks challenge.


You definitely need patience and good eyesight with the cutting, clean and simple doesn't necessarily mean quick but the results are worth it. I wanted to keep the monochrome look so opted for a piece of satin silver cardstock to back the stamped images. The most difficult part was trying to get a photo on the right background that showed the tones....if that makes sense with monochrome? It was even more difficult on such a glorious sunny day like today, however it meant I even took pictures outside so you can see the lovely metallic glaze.


I've had a pack of these frames for years and had lots of ideas but never quite got around to transforming them properly. I can now see me making a trio of these for the hall......when my cutting finger has recovered that is!

Saturday 17 May 2014

Pretty in pink

Just before I started to write this post, I had been blog hopping and I've just read about Ranger discontinuing the meltpot in this post on The Artistic Stamper blog.........I can only hope it will be back in some form or another, mine is still working and hopefully will continue to work for a very long time especially since I took a meltpot class with Hels.
Yes it has been dusted off again and I am enchanted with beeswax at the moment. Here's my entry for The Sunday Stamper challenge, 'Pink'


Using beeswax is a great way of being able stamp on an uneven surface. I picked up a couple of very rough wooden hearts in a sale section and you can see the before and after of using some fresco paints straight onto the surface.


I don't think I am giving too much away by saying you stamp onto tissue and then apply to your piece. The stamps I've used include probably my most used stamp, the flourish from Crafty Individuals, I've also used their text stamp and the sequin waste stamp is from The Artistic stamper. I didn't want there to be too much black so I highlighted areas of the flourish with a gold Posca pen.


You can also see the drips of wax (love them) and treasure gold in renaissance and spanish topaz on the embellishments. I painted the embellishments first with Luminarte 'Black Ice' silk acrylic glaze and have also used it to edge the heart. I bought a set of six mini acrylic glazes to try and hadn't realised there was a black in with it and at first thought it was just black paint but no it has a touch of glimmer in it...lush.


Hopefully you can see the shine from the mica applied over the wax  (perfect pearls blush and a deep pink mica). Hopefully pretty but with a hint of steampunk. Thanks for stopping by. 

Sunday 11 May 2014

'Tiny Tin'

Liesbeth Fidder gave a wonderful tutorial of an altered sewing tin here on the PaperArtsy blog this week. It inspired me to have a go at altering a tiny tin that I have.


It's about 6cm or just under 2.5 inches across. I took pictures of the tins post burning on the kitchen hob, worked really well (Hazels tip, thank you). And yes I have another one I have other plans for now.


 I've used a mixture of 3 sets of sewing themed stamps that I have as I don't have any of the PA themed ones. Forgot to take any more photos until complete but the steps are virtually the same just with some adaptations because the tin is round, smaller and deeper than the original and presented a few challenges.


Inside the lid with a few tiny additions to add dimension and mirror the base.


The mini spool and glass vial add some depth, the spool has been aged with fresco paints and some treasure gold 'onyxite' used to age the shiny sewing machine and the prima metal embellishment on the lid.


The material was frayed and then scrunched up under the motifs and buttons as I realised that circles of fabric don't fray in a circle (!)...but I like the effect and I used a couple of layers of cruchy waxed paper to give more dimension.


I'm entering this in the PaperArtsy weekly challenge. Quite enjoyed producing a dinky something which is now sitting on my shelf not taking up much room....and that's always a bonus!

Saturday 10 May 2014

Painted squares

I didn't get chance to make another entry for the CC3Challenge on marbling with distress paints before it closed but I had made a few backgrounds of lovely vibrant colours. So following on from the last post decided to combine techniques (ish) and create some simple cards.


I am entering this one in the Sunday Stamper Challenge, the theme is 'Life' and I've used one of my favourite stamp sets. It's finished off with a little gilding.

Tuesday 6 May 2014

Patchwork Heart

Quick card made of scraps, love using up favourite bits of paper and stamped images like this. I have made cards with a square of 9 before now but thought this would be effective using the Paperartsy heart die.


 There is a swipe of old paper DI and I've used a computer font as surprisingly I don't have a stamp with that sentiment. The lace was left over from a workshop and I've added a button, so all in all pretty scrappy which is why I am entering it in the lets get scrappy challenge over at Creative Corner.

Friday 2 May 2014

3UP part 2 with Ellen Vargo stamps


Just thought I'd share some step by step photos of my 'Tropical Secret Garden' which was posted earlier here on the PaperArtsy blog, apologies photo heavy post....Firstly how the background was made building up the layers of colour, I'm not going to go into too much detail here as it's explained on the PaperArtsy blog post.


Light colors first, Zesty Zing and Limelight over the text stamps


Continue using a baby wipe to apply the remaining colours 


Then the stencils..and stamps


Petals for the flower stamped on cotton covered smoothy card, it curves and holds its shape beautifully.


Side view hopefully shows the flowers dimension.


Absolutely loved doing this, thanks for stopping by.

Paperartsy 3UP alert!!!

So lucky..... I was randomly picked to do a project for Paperartsy 3UP! I got to play with some lovely Ellen Vargo stamps and what a great time I had, here's a sneaky peek...


.....to see it all and the rest of the 3UP's wonderful artwork please hop over to the Paperartsy blog now.

Thursday 1 May 2014

Classic wheels!

Yes the Sunday Stamper Challenge numero '305' is all about wheels....well I struggled with this at first because I couldn't think of any stamps I had that had wheels....cogs and gears yes...but wheels? Well as you can see I did find a mini stamp and along with the sentiment it's probably one of the most iconic stamp images.........which meant it had to be a tag.


I decided to try out distress paints which I haven't used before and used broken china and crushed olives. Liked the effect, the cogs and gears are from IndiogoBlu. The main image is embossed into clear UTEE on cardboard having put a swoosh of distress paint underneath the image. There is also some tarnished brass distress paint and Treasure gold (of course). BTW I did also find a pram and a rickshaw so I did have a few more options. Thanks for stopping by.

Updated.... meant to add that I have been trying out distress paints so I can play along with the CC3C challenge being hosted here but I have another week to submit something 'marbled' so watch this space!....2nd update..after Hels comment I am going to enter this via the link into the Tim Holtz Compendium of Curiosities 3 Challenge at cc3challenge.com.CC3C  after all.....I can always submit another next week!