Hi everyone, firstly thanks for all the encouraging comments about my first video! Lovely to hear such positive feedback. I have an inspiration post this morning over at Stamps and Stencils.I've been using infusions with fabric and created a small fabric plaque using one of the new JOFY stamps. Hope you'll hop across and see what I've been up to.
Hi everyone, well the last month certainly 'flew' by and now it's 'time' for our next challenge over at Stamps and Stencils....bit of a hint there...it's our DT lead Sue who is the host for this months challenge, here's what she has to say about it.
For this challenge I would like to see anything relating to flying, so this could be a bird or a butterfly or it could be an inspirational quote that includes words relating to flying ! As always, please remember we are a mixed media challenge and you must include either stamping or stenciling or both !
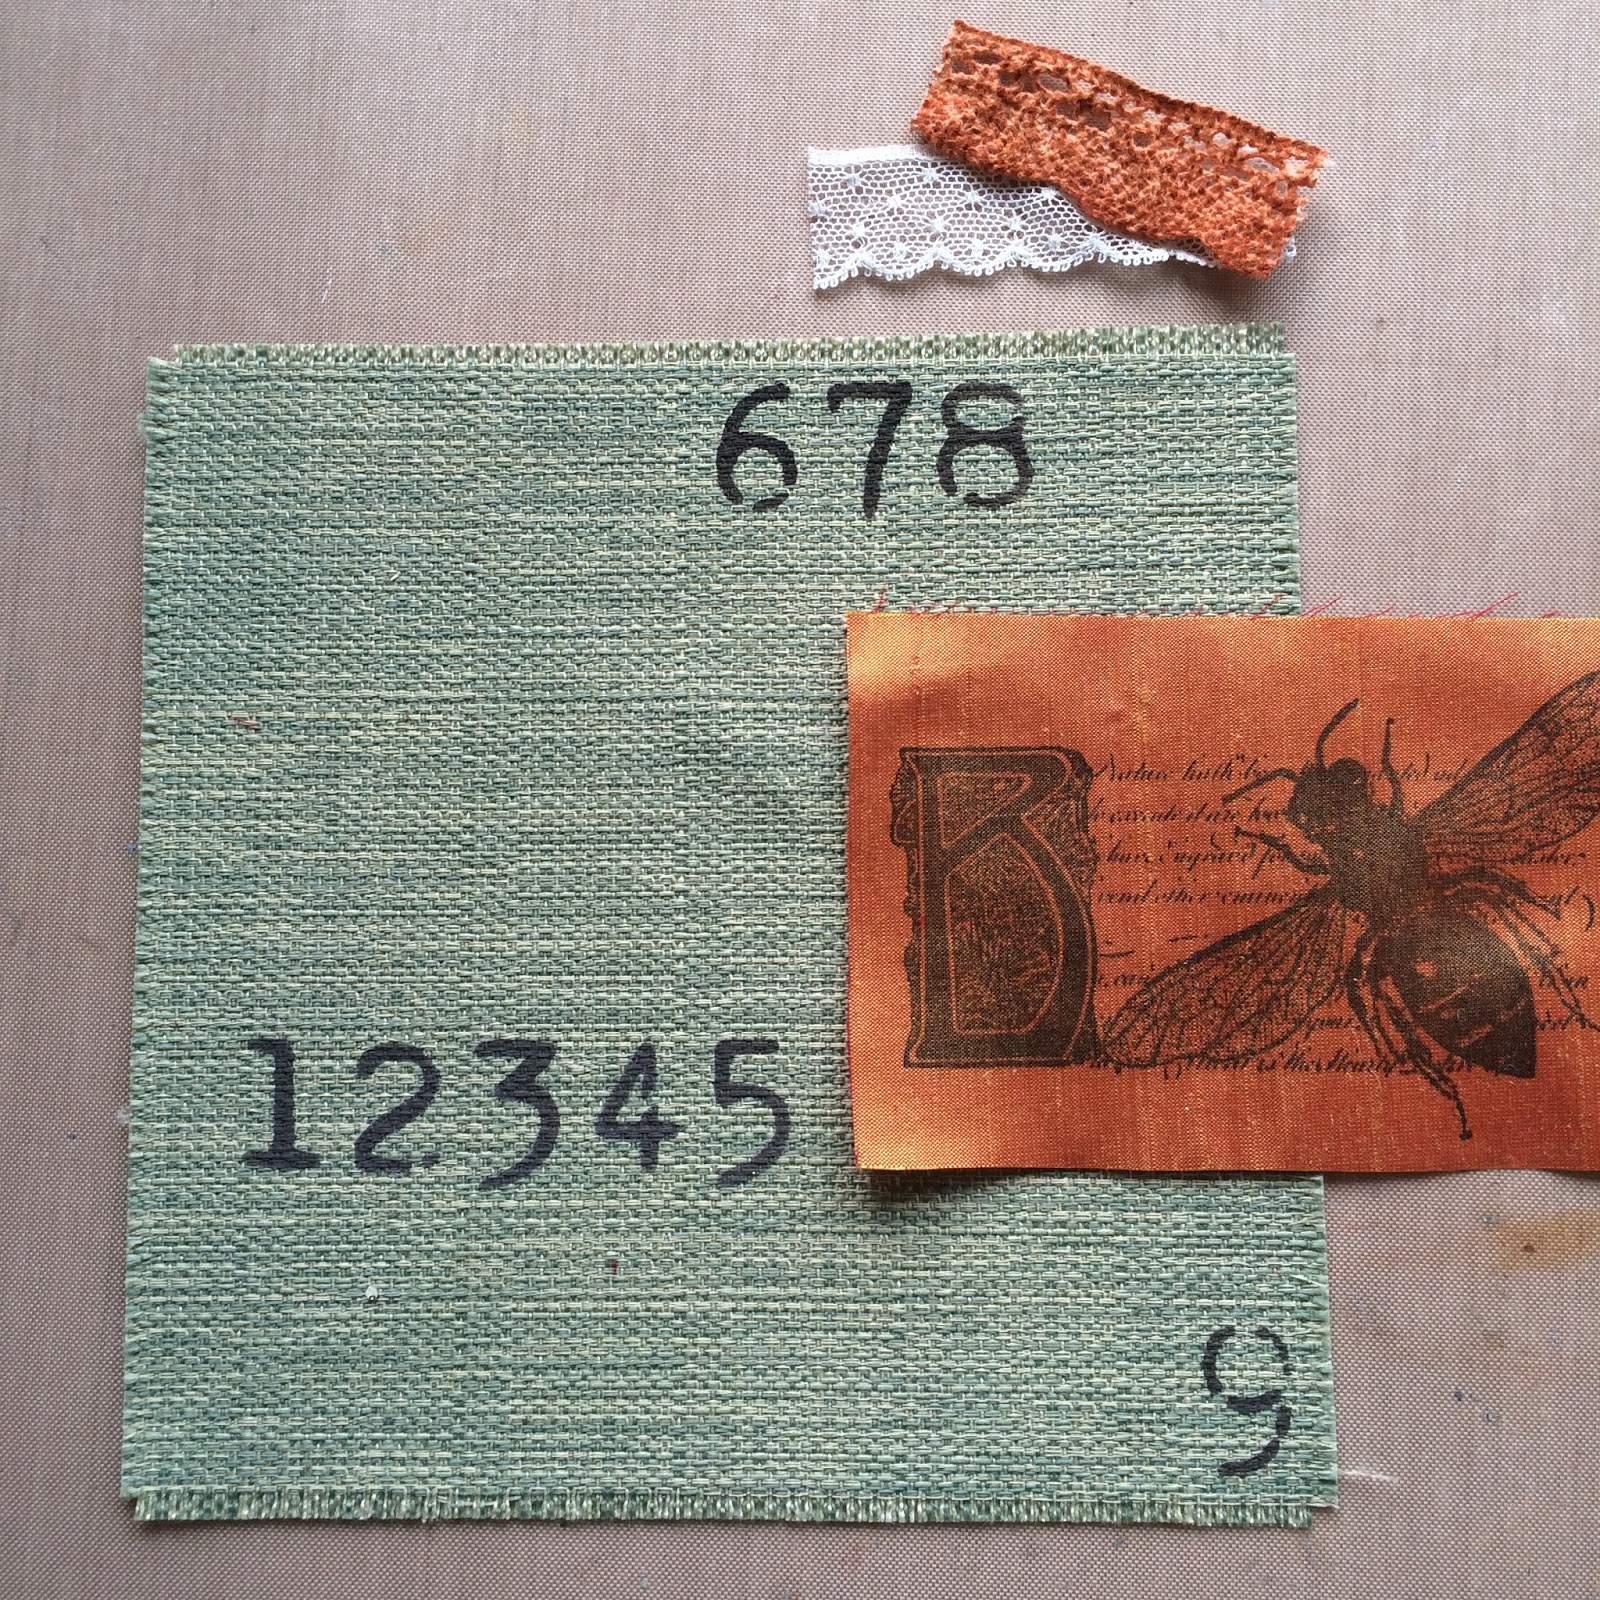
I've chosen to make a fabric page this month which will eventually form part of a fabric book. I first made one a few years ago on a wonderful Artsycrafts weekend which was a weekend workshop run by PaperArtsy....of which I have very fond memories. Although the base is fabric, this would work just as well on a canvas.
In looking around for inspiration, I was thinking about insects and came across a metal bee embellishment similar to one I'd used in my original fabric book. I thought it would be good to create another book and start by creating a fabric page....although in the end I didn't use the metal bee.
The Tim Holtz dragonfly was cut from some alcohol inked deli paper (from my Yupo post) which had been glued on to a music sheet.
The base was some green fabric and I stencilled the numbers with French Roast fresco paint. The Chapel Road bee stamp is stamped onto a gorgeous rust colured piece of silk and the lace was coloured with Infusions mixed with gum arabic to make it fast.
I then played around with the placement and decided I would stencil some Finnabair 3D transparent gel mixed with pear blossom primary elements onto the background. I then started to secure most of the elements in place by stitching.
A few microbeads and touch of treasure gold enhances the embossed dragonfly.
A little key and some stitching
Where would I be without buttons and lace...
To finish the edges of the cream canvas were zigzagged stitched.
Lots of things take flight, pop across to be inspired by my wonderful teamies creations and join in with our challenge!
Hi everyone, following on from my last post I've been messing around with fabric. I've tried EPP (english paper piecing) before without much success, this time around I've created a pincushion...or maybe it's half a football!
At a recent show I'd picked up some grab bags of PaperArtsy 'minis'. I had some Egyptian cotton on my desk and just decided to stamp all the images on to the fabric in black archival...so why the pincushion?
Well, I'd recently seen someone demonstrating EPP and it tempted me get some of my tilda fabric out and have another go. It's quite a nice thing to do in an evening and not sure what I'll make but I'm enjoying dabbling and it's a work in progress.
I was then trying to think how I could use it and thought a pincushion might be quite a good idea. I found a lovely turtle or tortoise made out of hexagons and pentagons and realised I wouldn't be able to use what I'd made so far but would need to cut out different shapes and that's when I decided to use the stamped images.
I decided not to make feet or a head just a round mound, only when I came to sew it up did I realise in black and white it could look like half a football. Anyway it's made and I'm entering it in the current Fabric challenge at PaperArtsy.
I quite liked the idea of making pincushions and so using some more tilda fabric I created another style of pincushion.
Short post but hope you enjoyed it and thanks for stopping by. Ruth x
Hi everyone, hope you're all well out there in crafty land? I was lucky (so lucky) to attend a Lin Brown workshop a few weeks ago. I know Lin published our projects on her blog here but I hadn't quite finished mine at that stage...well there's a surprise!
I still needed to do some hand stitching and now I've completed it thought I'd share my finished project with you.
I loved doing this project for so many reasons, the combination of metal embossing and having fun creating our own rusty fabric was equalled by the absolute pleasure I felt in reawakening my love of hand stitching. Gosh it brought so many childhood memories back....Binca...a handmade cushion I embroidered at 12...I won't go on but you can guess I loved doing this!!
A few close ups I hope you'll enjoy...
I have to confess that some of the rusty fabric above isn't mine, we used a combination of fabric we rusted and some of Linda's wonderful results. Although it's great to come out with a finished creation, the lasting joy of a workshop is to inspire you to develop what you've learned along the way.....so I came home and have had rusty hands and workroom that smells of vinegar ever since, but boy I've had fun!!
In fairness to Lin I'm not sharing the details of how we rusted our fabric but there's information out there on the internet and you tube if you want to explore this....or maybe Lin will be doing a similar one sometime in the future. (See her blog for workshop details)
I thought I'd finish by sharing some of the varying results of my attempts.
Mega rusting going on here, may have left it too long!
Quirky result as I used some tea dyed fabric...but I think the tea should have been fresh...not stewed!
Front...lovely
...but I think I like the back even better.
I love this crackled effect
Who would have thought there would be such a variety of rust tones and I've only just started to experiment. Next project will be a set of smaller frames using some of the above fabric.
Hi everyone, it's the new product launch this week of PaperArtsy goodies and tonight it's the turn of the wonderfully talented Lin Brown. I've long admired Lin's work and guess what...I got to play with her new stamps as I have the honour of being one of her wingmen for this release! Firstly enjoy a video from Leandra (Mrs PaperArtsy) showcasing all the new goodies and samples. Eek!
Well I think we all went sample crazy because the stamps and stencils were so easy to work with so I'm sharing the ingredients of mine over 2 posts, 4 tonight and the remainder tomorrow. It's a long photo heavy post so make yourself comfortable.
I just had to make something using this magnificent flower head as the focal point, combine that with my love of using textiles and Rusty Bloom was born. Here are the ingredients.
I sprayed teabag paper with LSG sprays before stamping the image with glue and sprinkling with rusting powder. A vinegar and water mix was then sprayed on to the image to rust it. Lastly a little glue brushed on before adding bonding powder and some wow fab foil in gold and copper.
The image was stitched onto book page and good old fashioned mulberry paper from my stash.
To finish, leafy images were stamped onto a piece of hessian and then grunge paste spread through one of the new stencils before some dry brushing with paint.
Next up I've used the delightful Daisy plate
It was time to get my 3 x 5 Gelli plate out mounted on an acrylic block and using the paints and stencils stamped onto card and fabric. Further stamping with archival inks created the background above.
The daisy reminded me of the flower Rudbekia which has gorgeous claret petals so I stamped onto crunchy wax Kraft paper to create the bloom. Love the font on the sentiment too.
The printed fabric was used as a base for a couple of atc's.
The fabric was further enhanced with stencilling, stitching and a little glitter. Loved the colour palette we were given to work with, all warm brown tones.
Last up tonight are the Lilies, these were stamped and embossed onto more of the Gelli plate print card and further shaded with pencil crayons.
It has a crackle background with additional stamping and another new stencil with some further shading. I seem to have gone stitching mad as well!
I was over the moon when Lin asked me to be one of her wingmen along with the very talented Hazel Agnew and Karen Eaglesham. Please hop across and see all the fabulous samples on the PaperArtsyblog and check out all the weeks releases.....and hope you can pop back tomorrow when I'll be sharing my remaining projects.
Thanks as always for stopping by and I hope it goes a little way in explaining my absence of late.
Remember me? Well around here my mojo has been in hiding the last few weeks, hence no posts. Thankfully it did return briefly last weekend so I could complete some DT stuff but then bimbled off again somewhere. Hope it's having a nice time anyway :-)
I went back to something comfortable and have eventually completed a couple of journal pages just in time for the'Hidden Objects'challenge atPaperArtsy.
I've started to use an old book for some styles of journalling. I've removed some pages and turned it upside down which is something I've noticed Marta Lapkowska does.
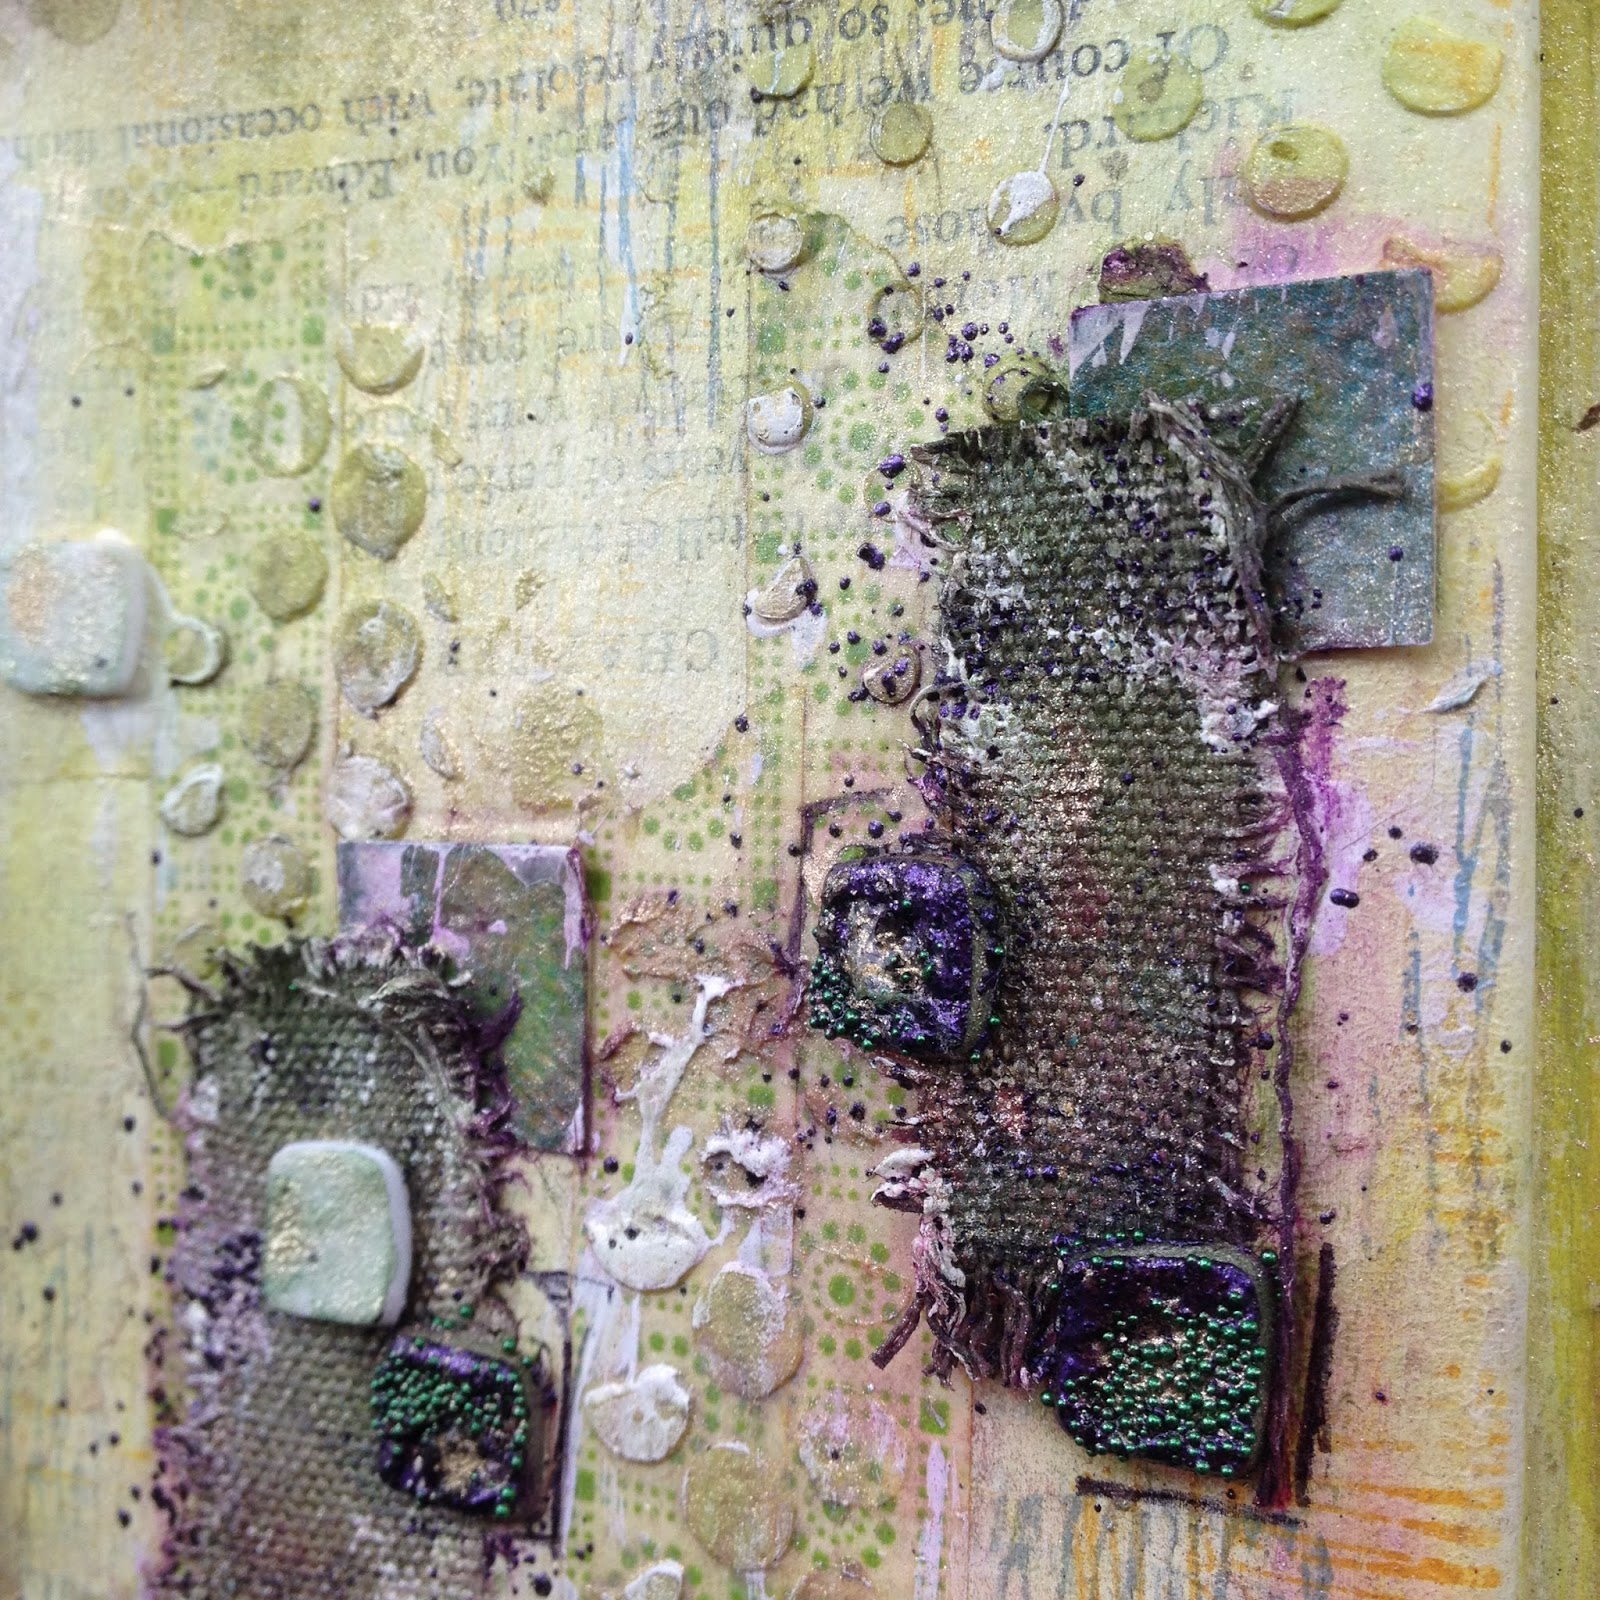
Washi tape, embossing paste through a stencil and Lindy's stamp gang sprays. It is very green...
...and purple. Foam squares, embossing powder and micro beads with canvas and card from my scraps box.
So the writing is partly hidden and the finished pages have little people (objects) peeking out from their hiding places.
Thanks for stopping by. Hope it won't be too long before I'm back again.
Hi everyone, well to say I've been a 'giddy kipper' since I was asked to do this is an understatement! The current challenge theme is 'Sprays' and here's a sneaky peek of my project, I've been making some fabric journal pages.
If you want to see the rest and some step by steps, please hop across to the PaperArtsy blog here to have a look, I had such fun making this! Thanks as always for stopping by. Ruth x
Hi everyone, I attended a Finnabairweekend workshop last November and thought it was about time I shared the pictures of what I'd made....if only because I have some pics from a much more recent Sue Carrington one which I'll be sharing in the next post!
I won't be explaining how they were made but hope you enjoy seeing the end results....she has some new workshops for this year and I'm looking forward to going to one of them in May (yes just one this time)....just love her work, I find her so inspirational...and she is such a great teacher.