Showing posts with label heart. Show all posts

Wednesday, 14 September 2016

Inky Cards at PaperArtsy

Hi everyone, I have a post over on the PaperArtsy blog tonight where I'm sharing some cards I've made for the current challenge which is all about Mark Making. I had great fun experimenting and here are a couple of sneaky peeks...


Hope you'll pop across to see how I made them and hopefully you'll be inspired to join in with the challenge. Thanks so much for stopping by. Ruth x

Tuesday, 28 June 2016

A few cards...

Hi everyone, hope you're all well out there in blog land, just thought it was time to share a few cards I made recently.


Brayered paint, some stencilling and a flower to match.


This was  a card made in a rush....I had half an hour but luck was on my side at the time.


Next a painty background using a credit card to scrape the paint (a technique I saw on the PaperArtsy stand).


Took a few attempts to keep a nice clean edge as I am such a messy crafter. I added some stickles and white pen spots too.


And to finish this trio of cards, I'm sharing a trio of hearts.


A crackled heart


Colorstix and stencils on this heart


...and for those that may have wondered what I made with my infusions and gel experiments (see here), love how this turned out with the addition of a little treasure gold.


Thanks as always for stopping by.

Friday, 30 January 2015

'The key to my heart'

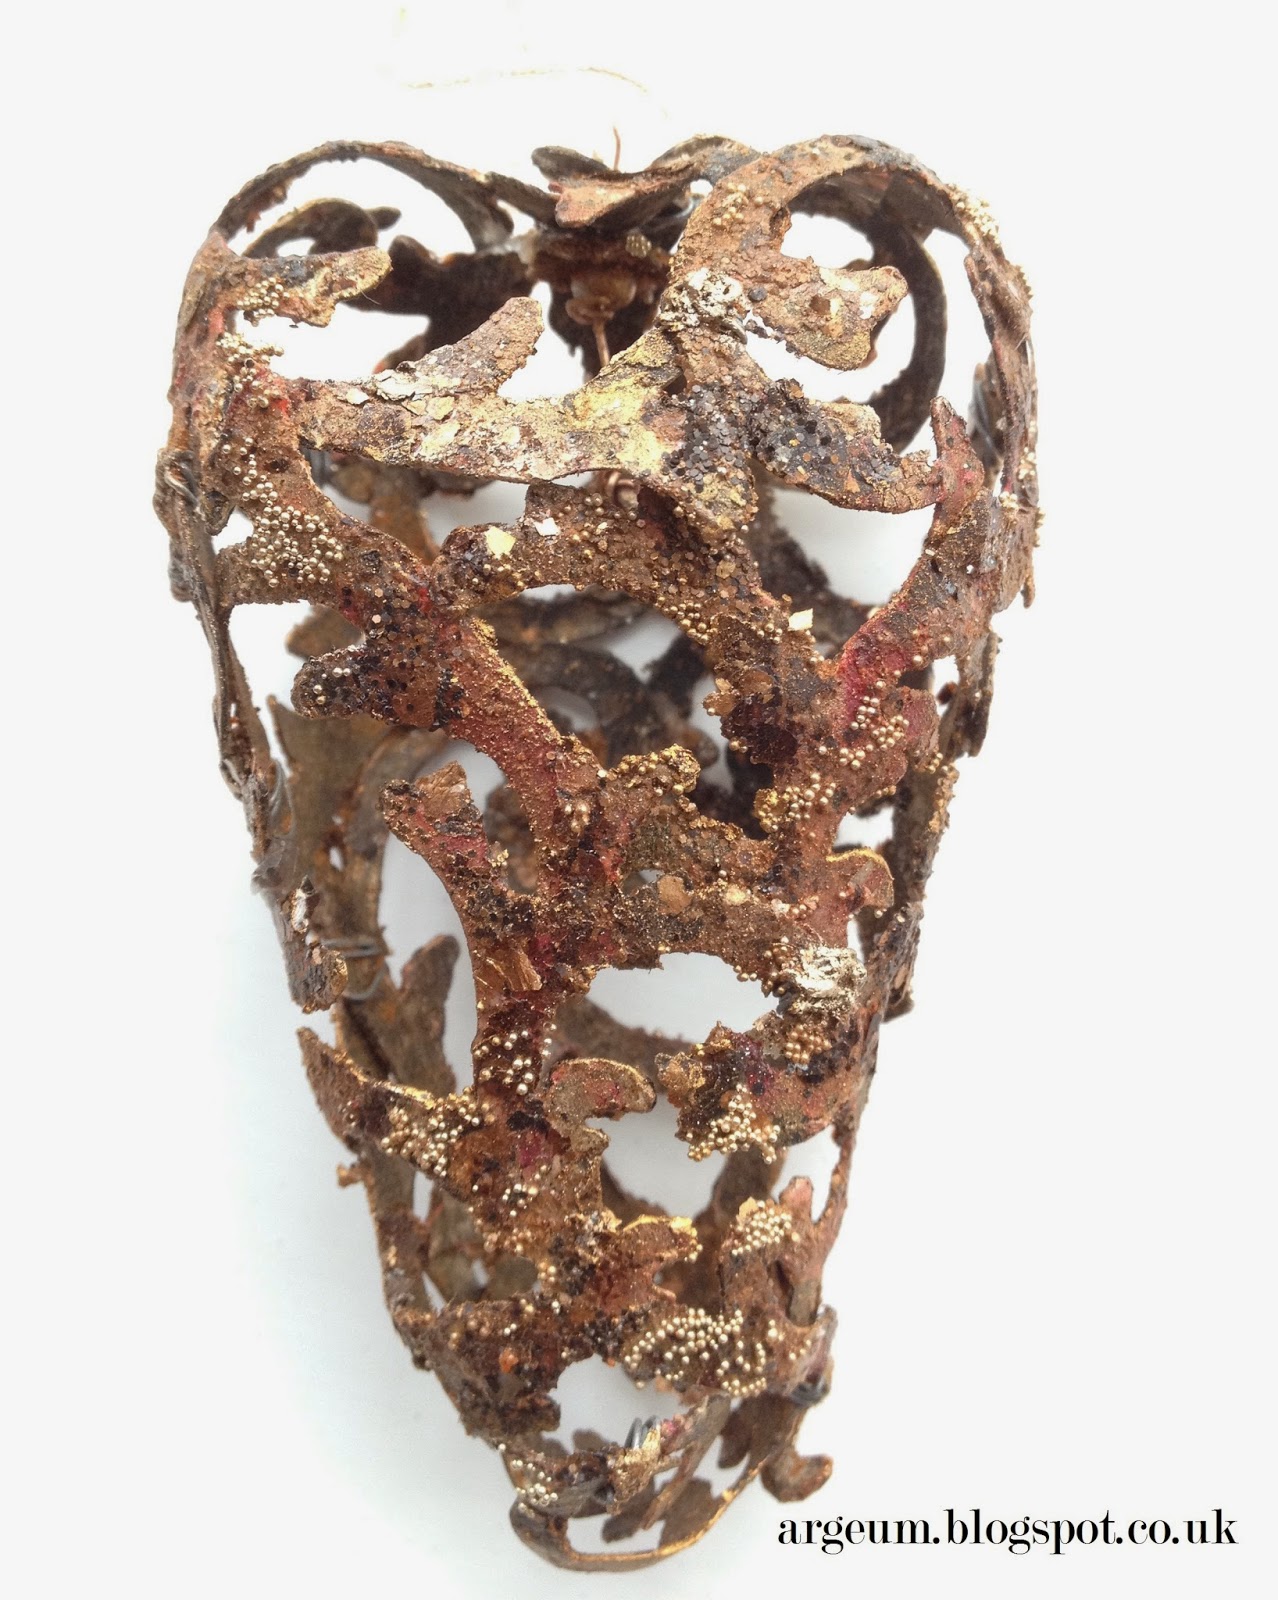
A few months ago there was a 'to die for' challenge over at A Vintage Journey, the 'effects powders' challenge for CC3C and a couple of Heart inspired challenges....and I had an idea! Unfortunately the original idea didn't work so I put it to one side...until now. This is my filigree heart, starting to crumble and rust away but still beautiful with hints of the gilding and precious metals that once adorned it.


A lover's tree decoration with a hidden key.....


When I saw that the current challenge over at A Vintage Journey was 'Love is in the Air', I got my thinking cap back on. Celebrating all things Tim, my inspiration comes from the rusting, ageing and worn effects he creates.


Firstly carve a heart out of brown oasis, (I picked this idea up at a class of Michelle Webb's). You can finish shaping and smoothing it with your hands then cut it in half lengthwise. It creates a wonderful mess!


This is from my first attempt when I thought I'd use flourish die cut grunge paper and embossing powder, hoping it would hold it's shape, but it didn't.


Second attempt was to use clearly for art film, which could be heat molded into shape. I thought I'd use clear and then realised I couldn't see the shapes on the foil covered oasis so painted it black with black ice silk glaze. I wanted the inside to be dark to provide some contrast anyhow.


I cut about 8 pieces and then started to form it around the heart with tiny bits of overlap.


I realised I wouldn't be able to use any heat on it from now on, so gradually built up the look using the above with matte gel in lots of layers.


I started with iridescent gold silk glaze and a touch of love struck dry brushed in areas before  using glitter, mica, micro beads.


Every so often I would 'knock it back' with cinnamon and paprika, see link (thanks Brenda ...fabulous  inspiration!). Once I was happy with it I used some very fine wire in several places to join it together...so it looked like repairs had needed to be done to prevent this valuable treasure from falling apart anymore...


The key had the same treatment and I wrapped some copper wire around it to make a rigid hanger. It's secured through the top between a bead and a small rusted washer. I'm also going to enter it at the  Inspiration Journal challenge this month which is 'Fresh Start' , I've certainly tried some new techniques with this one.

Honestly, although it was a bit fiddly to assemble, probably the hardest part was trying to get a good photo showing it's true colours!

Against black


and white.


It's 9 cm in length and surprisingly resilient but lightweight ...and yes it will adorn our Christmas tree this year. Hope you enjoyed this post, thanks again for all your lovely comments, I really appreciate every single one. Have a lovely crafty weekend!

Friday, 10 October 2014

Multicoloured stamping for Craft Stamper

Hi everyone, so pleased to be sharing my GDT project for this months Take It Make It Challenge over at Craft Stamper. This was part of my prize for winning the August challenge ....with 'Mr Rusty' as he is now known. This months technique is muticoloured stamping, which could be inks, pens or in this case....paints!


A floral heart, inspired by those glorious showy blooms that you get right at the end of summer going into Autumn.....and it's definitely Autumn now! A few weeks ago I saw some beautiful dahlias which were such a bright red with a lovely yellow centre and decided I'd use the Lin Brown eclectica ELB01 set ( a favourite) to create this piece.


The text is stamped onto tissue paper and comes from another Lin Brown set - ELB05. I started off with the middle sized heart from a set of 3 Indigoblu MDF hearts.


I used fresco finish paints throughout with a coat of Nougat to start. I was at the HSNW show at Port Sunlight this weekend and 'stalked' Leandra from PaperArtsy demoing a brayering with paint technique....I was just fascinated that's all. I used a mini brayer and just kept building up layers of colour, then added in the leaf stamp in 2 colours (guacamole and hey pesto) some more brayering and then white stamping (snowflake) using Sara Naumanns eclectica ESN10 text stamp.


The flowers were stamped onto off white card and I used a piece of cut and dry foam to apply the paint. Working from the inside to the outside I used yellow submarine, london bus and a touch of french roast. I tried a few other combinations but this was the most dramatic. 'Fussy' cut out and then layered onto the heart with one layered up in the middle. The thong was stained with potting soil archival, which I also used on the side....and of course a little spanish topaz treasure gold on the edge.

To see some more fabulous inspiration hop over to the Craft Stamper blog now. As always thanks for stopping by and huge thanks for all the lovely comments you leave....they make my day!

Saturday, 9 August 2014

Vellum hearts

Sometimes when a piece inspires me, my creation can be pretty similar to the original...and sometimes an explanation may be needed! Over on the PaperArtsy blog this week Keren Baker used vellum to create a sky and grass project. It inspired me to create this little wall plaque which I am entering into the PaperArtsy weekly challenge here


I liked the idea of stamping on vellum and using wire but I didn't have the flower stamps or dies used. What had I got, well my much loved PA heart die and instead of text I thought swirls. So I stamped on some vellum with a Darcy mini stamp (EM06) in 2 different directions with a satin pearl embossing powder.


I then used distress markers and some water, but I probably used a bit too much water as the vellum went crinkly...but I liked the effect, it looks more textured. on the finished panel.


The original piece has some background text so keeping in theme with that I painted a 18 x 12.5 cm canvas panel with some snowflake fresco paint and then used a stamp from ELB06 across the central part of the panel, stamping in versamark and satin pearl again. At this stage I was still thinking I would wire 2 hearts together off the panel but after some playing around decided to use 3 hearts and wrap copper wire around each of them. They were glued down with matte medium and of course the shape of the wire can be seen through the vellum, but I quite like that. The panel was then finished with some copper foil tape from my stash......Thanks as always for stopping by.

Thursday, 19 June 2014

'Cracked heart'

Just a quick post. I've been messing around with patchwork hearts again, this time in reds and golds.


 I have some Croco Crackling in clear (tongue twister!) that I think may have been in my box too long as it isn't very clear, but I love the effect. Once dry, I dripped some Luminarte Radiant Rain onto it and let it seep into all the cracks. A bit of string and a key with a touch of treasure gold and the heart is finished. It's mounted onto a DI stencilled background (TCW garden gate stencil) and I punched  a circle of remnant rubs out and applied to finish the card. No stamping (I know!) and not entered into any challenges, just thought I'd share. Hope you have a great weekend, I think I will....I'll be 'dabbling'...Thanks for stopping by,

Saturday, 17 May 2014

Pretty in pink

Just before I started to write this post, I had been blog hopping and I've just read about Ranger discontinuing the meltpot in this post on The Artistic Stamper blog.........I can only hope it will be back in some form or another, mine is still working and hopefully will continue to work for a very long time especially since I took a meltpot class with Hels.
Yes it has been dusted off again and I am enchanted with beeswax at the moment. Here's my entry for The Sunday Stamper challenge, 'Pink'


Using beeswax is a great way of being able stamp on an uneven surface. I picked up a couple of very rough wooden hearts in a sale section and you can see the before and after of using some fresco paints straight onto the surface.


I don't think I am giving too much away by saying you stamp onto tissue and then apply to your piece. The stamps I've used include probably my most used stamp, the flourish from Crafty Individuals, I've also used their text stamp and the sequin waste stamp is from The Artistic stamper. I didn't want there to be too much black so I highlighted areas of the flourish with a gold Posca pen.


You can also see the drips of wax (love them) and treasure gold in renaissance and spanish topaz on the embellishments. I painted the embellishments first with Luminarte 'Black Ice' silk acrylic glaze and have also used it to edge the heart. I bought a set of six mini acrylic glazes to try and hadn't realised there was a black in with it and at first thought it was just black paint but no it has a touch of glimmer in it...lush.


Hopefully you can see the shine from the mica applied over the wax  (perfect pearls blush and a deep pink mica). Hopefully pretty but with a hint of steampunk. Thanks for stopping by. 

Tuesday, 6 May 2014

Patchwork Heart

Quick card made of scraps, love using up favourite bits of paper and stamped images like this. I have made cards with a square of 9 before now but thought this would be effective using the Paperartsy heart die.


 There is a swipe of old paper DI and I've used a computer font as surprisingly I don't have a stamp with that sentiment. The lace was left over from a workshop and I've added a button, so all in all pretty scrappy which is why I am entering it in the lets get scrappy challenge over at Creative Corner.

Tuesday, 25 March 2014

Mono printing

Quick 2nd post, I am entering this in the Craft Stamper Take It Make It challenge for March.


A bit different for me in colours and style, mine is very much inspired by Trish Latimers example. Whilst I wasn't trying to copy the original I just found the background lent itself to that design. I used background stamps and the hearts are stamped with Hero Arts text stamp, freehand cut out and scribbles with a posca pen. 


Do like the texture of the paint, yummy.