Showing posts with label glass. Show all posts

Saturday, 6 June 2015

Blue Glass

Happy Saturday everyone!  Over at PaperArtsy the current challenge theme is 'Bottles'. I was inspired by Leandras video which included how to paint inside bottles and Emma Godfrey used this method in her post here. This set me thinking and having rummaged around, found one I liked the shape of and decided to experiment. This is the result.


I think the 'glass blue' paint name reminded me of some Swedish blue glass pieces that my mum has. I remember them vividly from childhood, the gorgeous blue and the rough patterned but geometric decoration. I found out they are Ruda glass by Göte Augustssonand here's an example.


Inspiration is just a starting point, for the inside I used glass blue and blueberry fresco and then for some reason decided I wanted some shimmer so I added some mica powder.....looks lovely but the paint took even longer to dry. 


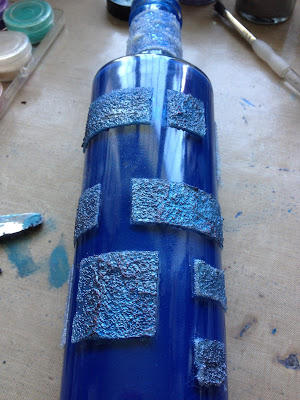
I decided to mask off squares and rectangles and use glass bead gel. 


This usually dries much clearer but the layer was quite thick and I'd also added some interference blue silk glaze ( like you do) which may have affected it. Liked the result but how to make it blue?


Treasure gold in Sapphire and Indigo with some Mica powder dusted for luck. Still not as dark as I'd first thought but I'm happy with how it turned out. Hopefully when it's fully dry inside it might hold a single flower.  It's different anyway!


Thanks as always for stopping by, have a lovely rest of the weekend.

Thursday, 27 November 2014

'Recycle for Christmas'

Hi, time for our next challenge over at ATP exchange and this time Yvonne is hosting it. With the festive season nearly upon us she has come up with a great challenge theme and is asking us to 'Recycle for Christmas'. It could be a box, a piece of packaging....there are lots of possibilities.


I decided to alter a star shaped bottle that I've had for years and could never quite decide what to do with but certainly didn't want to throw it away. It's about 6.5 inch/16cm high and originally contained some liqueur....which was a Christmas present!


I have been wanting to try Tim's Faux Cracked Glass technique for a while now and the idea developed of creating 'something' inside the bottle. The technique is the only part I won't explain as it can be found in Compendium of Curiosities III. I'm quite pleased with it as it's my first attempt....the only thing I will say is that as it's a star shaped bottle with many surfaces I probably should have tried doing a surface at a time, not the whole lot at once!


Firstly I used the houses from the CI 257 set to stamp onto a circle of tissue in black archival, then tore around the edge and adhered to the back with matte medium. On the front I masked off a circular area before covering the whole bottle in faux cracked glass.


I did use a lot of WV cornflower blue archival ink as I wanted a really intense colour.


Whenever I use shrink plastic I always think why don't I use it more often....I love it! At first I was going to make stars but then realised that stars belong in the sky not below the houses.  I found a snowflake stamp that would be small enough to go through the 1.5cm neck of the bottle....I do like a challenge. The star and text embellishments were made with PaperArtsy stamps (ID07 and Xmas plate 1)


There are 5 snowflakes suspended inside the bottle. I also applied some PVA to the edge of the circle and applied glamour dust before colouring with blue archival.


The cork was split and holes made in the top to thread the metallic thread through. A crackle effect was applied to the cork using frescos in space cadet and antarctic with PaperArtsy crackle glaze. I finished the cork with a button from my stash that I gilded with sapphire treasure gold.

Hope you enjoyed your visit, please do hop over and see the wonderful creations of the Design Team, I'm sure you'll be inspired and we can't wait to see what you'll recycle! Thanks as always for stopping by.

Thursday, 16 October 2014

Halloween votive

Well it's 'Halloween' time over at ATP Exchange for our second challenge which is being hosted by the very talented Annie


What does Halloween mean to me? Well it's certainly a 'celebration' that seems to have become more firmly established in recent times, but even when my children were growing up I did have to carve a pumpkin each year (of course, any excuse to craft!) So this is my scaled down offering. An altered votive in that wonderful pumpkin orange colour.

It started out as a plain glass votive and just to make it extra tricky, how to stamp on it's curved surface?


Difficult to see but I have applied a coat of matte medium first so the paint/ glaze would have something to stick to.


I then applied a layer of PaperArtsy crackle glaze before the next layer which was  Luminarte Silk Acrylic glaze in Persimmon . Don't you just love that shimmer? As you can see it gave a lovely crackle effect but I wanted a more dramatic effect. I used some of the new Finnabair clear crackle texture paste and thought it would just give a clear crackle on top, instead I got an even better effect, possibly because it was on top of an existing crackle and a glaze. Whatever the reason I got some fabulous crackles.


Once dry I stamped in black archival on to tissue paper using PaperArtsy HP Halloween 01. I then tore around the images and applied them using PaperArtsy satin glaze.


To finish, Artist Trading Post have these steampunk skull metal embellishments in their Route 52 range which fits in with the theme. I painted them with persimmon and cinnamon brown silk acrylic glaze and adhered with matte medium. 


Love the way the flame shows through the cracks......a bit spooky?


Please hop over to the ATP Exchange and see what the rest of the talented DT have created and hopefully will inspire you. Thanks as always for stopping by.