Pages

Saturday, 28 May 2016

Infusions..part 2

Hi, as promised I'm back to share some more of my infusion explorations...this may take some time. First up is 3D gel, and I've used Finnabairs transparent 3D gel for this.


I made these before I saw Nikki's fab post here of Addicted to Art where she used texture paste and her way is a much better way of doing it especially if you want crisp, clean results, however here's the method I used which gives grungier results.


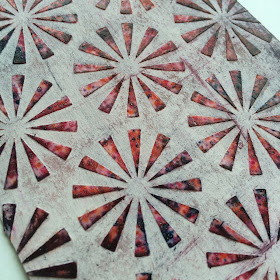
I placed a stencil over card and spread the gel through it, once removed I sprinkled a mixture of infusion powders over the gel and left to dry. I was quite generous because I wanted the powders to show up.


Once dry I flicked the powder off, but there will always be some residue and I decided to use some white paint and matte glaze hoping that the 3D gel would resist the paint....now this gets worse before it gets better.


Yes I created mud!! The middle section is the result of painting over with white (honestly) but take a baby wipe to it (far right) and the pebbles will pop.


I really loved the result, here's the other one.

.

This is a more open stencil and I've used some archival ink brushed across the top.


There's something about the gel on the grungy background that I really like. It then took another week and some further experimenting for the penny to drop that as the paint and glaze have now sealed any infusions in I could paint over with another colour and make them lighter if I wanted.


I rubbed over the gel with some archival ink to make them pop more.


I've used gold paint here.


and here I mixed metallic glaze with some london night paint to just give a subtle shimmer....this is before


and this is after


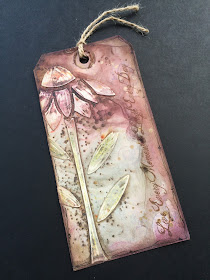
These are the 2 tags I made at the beginning of my experiments.


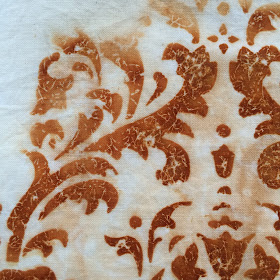
Another way of using a stencil which I find so easy and so effective came about from shaking the excess infusion off onto a piece of card and instead of just adding water, I put the stencil in place first.


Really doesn't look like there is much powder there but...


One spray


and a little more, then be patient


Don't take the stencil off right away, let the darker crystals work their magic. Then dry.


I think this is where these powders just excel because you get a lovely vintage effect that you won't be able to create if you use a spray. 


I shared these earlier this week on FB but not the how....which is so easy don't you think? 


Before


 After... using a favourite PaperArtsy set,  and the gold shimmer is color stix. I still have a couple more little tags of further dabbles to share but I'll pop back soon with those.

Hope you enjoyed the rather lengthy post and as always thanks for visiting. Ruth x

Monday, 23 May 2016

Infusions..part 1

Hi everyone, well I've had messy hands recently playing with the new PaprArtsy Infusions, I saw Leandra and Emma demo them at the Happy Stampers festival at Port Sunlight earlier this month. I've already shared a few 'plays' on instagram but thought I'd share a few more experiments and details with you here.


This was a happy accident. One of the ways you can use the infusions is to sprinkle them on and then brush over with a glaze which will seal them at the same time. I'd seen some lovely effects with pearl and metallic glaze. I had some left over infusions which had shaken on a piece of glossy card and thought I'd picked up pearl glaze, only when I started to paint with it did I think it looked a bit different...I'd picked up chalk fresco instead! Well I carried on, dried it and rather liked it.


Some gold stamping using a Sara Naumann Eclectica set made for a quick card.

I have used paint before to knock back a vibrant background and there's no reason you can't use it with infusions. 


Watered down snowflake fresco brayered over the top.


Add some stamping with archival inks and you have a background.


Those of you who know me will be aware I love grunge paste, so here's a tag which when I shared before I hadn't quite finished, it needed some stitching. I've used  a new favourite  'pebbles tied' stencil with the grunge paste.


To finish part 1, I'm sharing a before and after tag. Whilst at Port Sunlight I was asked to step in and do a quick demo which I wasn't prepared for, anyway the tag I did I wasn't happy with...but all was not lost. Here's the before.


A coat of fresco in chalk, once dry I sprinkled some sage and blackcurrant infusions spritzed with water and it was looking better.


Love the 'granules' effect


Quick sand back, like that some of the stamping underneath is peeking through.


Add a sentiment and a touch of gold....I was much happier with that!


Well that's the end of part 1 hope you'll come back soon for part 2, I'll be using 3D transparent gel next time.

 Thanks as always for stopping by. 

Saturday, 14 May 2016

Rusty Stuff with Lin Brown

Hi everyone, hope you're all well out there in crafty land? I was lucky (so lucky) to attend a Lin Brown workshop a few weeks ago. I know Lin published our projects on her blog here but I hadn't quite finished mine at that stage...well there's a surprise!
I still needed to do some hand stitching and now I've completed it thought I'd share my finished project with you.


 I loved doing this project for so many reasons, the combination of metal embossing and having fun creating our own rusty fabric was equalled by the absolute pleasure I felt in reawakening my love of hand stitching. Gosh it brought so many childhood memories back....Binca...a handmade cushion I embroidered at 12...I won't go on but you can guess I loved doing this!!


A few close ups I hope you'll enjoy...


I have to confess that some of the rusty fabric above isn't mine, we used a combination of fabric we rusted and some of Linda's wonderful results. Although it's great to come out with a finished creation, the lasting joy of a workshop is to inspire you to develop what you've learned along the way.....so I came home and have had rusty hands and workroom that smells of vinegar ever since, but boy I've had fun!!

In fairness to Lin I'm not sharing the details of how we rusted our fabric but there's information out there on the internet and you tube if you want to explore this....or maybe Lin will be doing a similar one sometime in the future. (See her blog for workshop details)

I thought I'd finish by sharing some of the varying results of my attempts.


Mega rusting going on here, may have left it too long!


Quirky result as I used some tea dyed fabric...but I think the tea should have been fresh...not stewed!


Front...lovely


...but I think I like the back even better.


I love this crackled effect


Who would have thought there would be such a variety of rust tones and I've only just started to experiment. Next project will be a set of smaller frames using some of the above fabric.

As always thanks for stopping by. Ruth x

Thursday, 5 May 2016

Think Pink at Stamps and Stencils

Hi everyone, Branka is our lovely host for the May challenge at Stamps and Stencils and here is how she describes 'Think Pink!'

'I love to use pink colour in my projects especially the fluorescent pink. For this challenge we would love to see a mixed media project that has some pink in it somewhere! The possibilities are endless! Don't forget to include some stamping or stencilling or both in your mixed media project and remember we are a mixed media challenge blog!'

Well, as Branka had suggested 'include pink' I had every intention of using a few different colours and not just pink, but the blooms once made asked to go down the vintage, shabby, soft shades of rose and blush pink....so I just had to listen!


To start with I've used  my larger Finnabair art journal and prepped the white pages with some clear gesso. I've also had a large Donna Downey flower stencil 'Marigold' that I've been wanting to use for a while now and thought I'd use some of the techniques I learned from her online Inspiration Wednesday class last year (although I have to confess I still haven't completed all the pages....)


I used chalk fresco paint through another large DD stencil 'bubbles'.


Next some light modelling paste spread very thinly through the flower stencil.


This is an opaque paste, but you can still see traces of the bubbles through it.


Once thoroughly dry, I replaced the stencil and applied Golden gel matte medium onto the petals, I removed the stencil (remember to wash the stencil) and then burnished the petals with book text. It doesn't take long at all to transfer probably less then a minute but you need to keep checking and I can't say how other gel mediums will work.


Then gently rub the excess paper off with your finger. The text that remains will be back to front but that's part of it's charm to me. You can still see all the layers, hopefully creating depth and interest.


Next, some glazing. I started with tangerine twist fresco mixed with satin glaze (more glaze than paint) and brushed loosely over the flowers, leaving for a minute before wiping back with a baby wipe until I was happy with the result.


I then repeated with a Bougainvillea glaze and finally a Raw Umber glaze.

Unfortunately I didn't take a photo of the next step, which is another experiment using grunge paste. Some of you may remember a post of mine about brush embroidery called 'What If' . One of the alternatives I suggest is to use a stencil instead so this is what I used this time around. I placed the stencil back in different places and spread grunge paste through it, whilst still in place I used a paintbrush to brush strokes from the outer edge in to the centre. I loved the texture this created on the petals (grunge paste does take fine detail beautifully).


Before I did any painting I left the paste and the pages to dry thoroughly.


Then dry brushing with various fresco paints, some treasure gold and Lindy's stamp gang drips, drops and white paint splats.


I wanted to create different layers of flowers and finished the piece with a Lin Brown text stamp.


Remember the piece you create just has to include pink...but if you like pink then go for it! Hope you'll pop across and see what my talented teamies have created to help inspire you.

Thanks as always for stopping by. x