Pages

Wednesday, 25 June 2014

Something from the weekend...

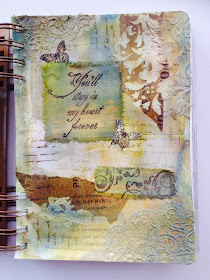
Quick post...I've just had a lovely 'dabbling weekend' at Lin Brown's workshop. We played and experimented with some fabulous products and I just thought I'd share this double page spread which I created.


I've used a small Finnabair journal I had. It was difficult to get a good picture showing the true colours...it's much greener in real life....and shimmery! Amongst the layers of tissue, doily and stamping are Luminarte silks, grunge paste and treasure gold.


As it is green and includes stamping, I am entering it into the Sunday Stampers challenge... the theme this week is 'Green Onions'.


Like many others I am having trouble with the blogger dashboard....only showing one post, so I hope you have managed to drop by or stumbled across this post. Take care and happy crafting.

Friday, 20 June 2014

'Bleach blocking'

The Take it, Make it Challenge over at Craft Stamper this month is all about Bleach Blocking. I thought I'd combine it with Artistic Stamper June challenge which has a Red theme.


I cut the foam to leave a square and a rectangle and got so carried away with the technique (see pg 28 July issue, Hels Sheridan) that although I liked what I had made...I was stuck as to what I was going to do next. It reminded me a little bit of Mondrians work at this stage with all the squares and rectangles....it just reminded me (I wouldn't dare to say it was remotely like his work). I came back to it after a few days and decided to go with pattern building with squares and circles. I've used Ellen Vargo stamps for the background in archival black and versafine crimson.


I then wanted to lift it, and embossing powder wouldn't do. I remembered I had some fab foil that I'd bought when I was inspired by a Birgit Koopsen post last year for Creative Jumpstart. 


I used another stamp from the EEV06 set and applied bonding powder to it, heated it and then applied the foil.


I'm hoping you can see the shine and reflection you get when the light hits it.


I used the Create stamp from The Artistic Stamper on another piece of of the bleach blocked card and mounted it on some black card on foam pads, I felt the lines coming off this word worked really well with the background. It was then mounted on a white card blank and I added a few black dots with a Posca pen. I hope you might be inspired to have a go at bleach blocking.....it's fun. Thanks for stopping by.

Thursday, 19 June 2014

'Cracked heart'

Just a quick post. I've been messing around with patchwork hearts again, this time in reds and golds.


 I have some Croco Crackling in clear (tongue twister!) that I think may have been in my box too long as it isn't very clear, but I love the effect. Once dry, I dripped some Luminarte Radiant Rain onto it and let it seep into all the cracks. A bit of string and a key with a touch of treasure gold and the heart is finished. It's mounted onto a DI stencilled background (TCW garden gate stencil) and I punched  a circle of remnant rubs out and applied to finish the card. No stamping (I know!) and not entered into any challenges, just thought I'd share. Hope you have a great weekend, I think I will....I'll be 'dabbling'...Thanks for stopping by,

Sunday, 15 June 2014

From cool blue to hot pink.

2nd post of the day?...don't worry it won't happen again. Well the blue phase didn't last long...(see last post). I'm sure it will return though. Over at the Crafty Individuals blog the June challenge is Tag you're it! It's the first time I've been able to enter this challenge since I started my blog. Here's my entry.


The background is the marbled distress paint technique in picked raspberry & mustard seed. I've then used fired brick around the edges


The stamps I've used are CI-017, CI-182 and CI-194, some stamped in archival black or brown and the flourish is embossed in WOW Metallic gold rich. The lace was coloured with antique linen distress stain and I've used white fire treasure gold on the beads and pearls. 


The flowers are cut with the smallest tattered florals die out of some  leftover gilded glassine paper from my 'rosy posy'  To finish I've added black 'wonky' stitching (hope that never goes out of fashion) and a dyed seam binding bow. The centres of the flowers are some little embellishments from my stash. 
I think the Crafty Individuals image is lovely, thanks for dropping by...hope you can enjoy some crafting x

Something blue

Over on the PaperArtsy blog this week Sara Naumann has inspired several crafters to use washi tape, link here. There have been some fabulous takes on this but I have kept very much to the original idea. I don't think I've used blue much in my posts so far.. maybe it's my next colour phase! Here is my challenge entry.


Like the post the stamps are from the Eclectica range and I've used alcohol inks and surgical spirit. I didn't have a large flower so looking around my bag of stash labelled 'don't throw it away, it might come in useful' I found some tissue and acetate that had been wrapped around a bouquet I received....I am so glad I kept it...and even the brad is very old stash that I've been hanging onto.


I made a few more and just need to put them onto cardstock.


Thanks for stopping by.

Friday, 13 June 2014

'Orange'

I bought one of the new Ellen Vargo stamp sets (EEV06) when I was at the Doncaster Show at the weekend and I've been playing with them alongside my current ones.


In a previous post I made a master board, primarily with PA paints. This time I've used pan pastels and added some texture with gold embossing, and highlights with a white Posca pen. It was just about having some fun and hoping to create some more abstract cards for my stash which seems to be emptying as fast as I fill it.


                                                          Hopefully you can see various layers building up.


Apologies light was poor on these photos.


I'd cut the master board at this stage


I started by using purple tones on a tag, then decided to make 'inchies', so I have some options for a variety of cards...hopefully I'll show you the results at a later stage. 


Detail also showing I've used EEV02 and a paperartsy mini (28) that jumped in the basket as well...honest!

I chose Orange so I could enter this in the current 'Flaming June' challenge over at 'Creative Corner'. I'd originally though I might make something vintage for this but changed course when I decide to combine it with the 'Sunday Stamper' challenge... theme 'Friend' . You'll have to read Hels post to see why I was inspired to use Ellens stamps, not that I needed much persuasion. So I am entering the card in both challenges.


You might recognise this composition from when I made master board cards before..it just seems to work...for me. Thanks for stopping by.

Friday, 6 June 2014

50 shades of brown....

...well almost. The Compendium of Curiosities 3 Challenge 3 this time is Faux tea roses. I didn't set off with the intention of making a bouquet of wired tea roses but here is the result....a 'rosy posy'


I'd originally thought I would make a few to go on 'something'...not sure what at that stage but just a few...Then I started to think what would make an unusual rose? I thought about Kraft glassine having used it in my last CC3C entry, and why not brown, after all weren't the first distress inks all brown tones? Anyway from there the idea grew.


I had fun experimenting with what worked and didn't and here you can see most of the 'ingredients'.


The far left shows alcohol ink on foil tape sheet which was adhered to card stock, this was die cut using 'tattered leaves' and 'garden greens' dies and then run through an alterations folder.
The leather look paper next is 'Gilded Kraft Glassine', the technique is in Vol 2. The glassine was adhered to a parchment paper to make it stronger, loved how this turned out.
The light brown/orange papers next are cotton paper and cardstock both coloured using the marbled distress stains technique.
Manilla card stock next, stamped in brown archival and perfect pearls in biscotti and heirloom gold.
Lastly kraft glassine again but this time stencils were used with embossing ink and perfect pearls again, this time kraft card was used to back it.


As you know in entering the challenge we can't share the technique on our post so unfortunately that also means I can't say how I wired them but I can say I used 26g florists wire. It's a few years since I wired a bouquet (sugar flowers) and it was lovely to have another play at this.


I've also used copper wire spring twiddly bits and film strip ribbon.

This time as it's an odd numbered challenge 'Inspiration Emporium' are sponsoring it, with a $50 dollar gift certificate! It may be a bit unusual submitting just roses but that's the fun of a challenge, when else am I likely to make a bouquet of paper roses?? Thanks for stopping by.

Tuesday, 3 June 2014

Inspired by Emma

A few weeks ago Emma Godfrey made some beautiful abstract background pages here on the PaperArtsy blog. I wasn't able to make this in time for the challenge but was inspired and wanted to have a go anyway. Here are the results.


I made several cards, some with sentiments and some without, just enjoyed making them for my stash which has sadly run down.


There is a you tube video that takes you through it step by step and I made 2 pieces using white smoothy heavyweight cardstock. 


The paint flicking was great fun, but it did go everywhere!


I haven't got a catalyst tool but improvised with some cardboard cut with zig zag scissors...didn't last long but it did for the project.


Grunge paste texture


Crackle paste texture


I mounted the pieces on black glossy card


Close up showing florentine treasure gold over raised areas and around edges.

It was great fun to do and think my favourite effect was the treasure gold over the crackle paste.Thanks for stopping by and do check out the video, great way to dip your toe in the water...or paint!

Sunday, 1 June 2014

Altered clock...part 2

The original challenge was to change or alter something and I'd thought about this project earlier in the week but hadn't had time to do anything until yesterday, which is why I was last minute Lucy!....now I've just found out that Country View Challenge this month is 'Only Men Allowed' (and this piece does have a strong male theme)....although this is a new post today with all the details and therefore isn't a backlink, I'm not sure it qualifies, as I posted a pic last night...however  as crafting is about sharing and I hope some of the techniques may be of interest, I will take the risk as they can always unlink me.

The clock has different tones in a different light.


This clock started out as my sons Postman Pat clock many moons ago and then was changed to a 'space theme' (very amateurish I know but it was 20 years ago) and that's how its been until yesterday waiting for a makeover.


I used several fresco paints including yellow submarine, taupe, chocolate pudding, french roast, irish cream, brown shed, blood orange and even started with a base coat of lake wanaka! I applied them with a baby wipe and had blended them quite well but I wanted some definition showing through as I was going to stamp on tissue and apply over, so I added some brush strokes of yellow submarine and irish cream.


I then applied some tinted grunge paste through the 'clockwork' clarity stencil (using chocolate pudding and taupe to tint it). I used a Crafty Individual 017 text stamp to make a further impression in the grunge paste. Once dry I dry brushed through the stencil with some french roast. 
I then stamped a variety of images and text stamps onto one ply of a large tissue using black archival, then heat set. The images used were from PaperArtsy Gentlemen no 3 and no 6, Darkroom door 'Steampunk' and Indigo Blu 'Take the Time'. I then applied the tissue that had been cut to size using beeswax ( yes the meltpot has been in use again).


It was quite easy to get the tissue to go into all the nooks and crannies, although I can see a crease on the bottom right but I think it adds to the aged effect! I added a little more wax to the outside and then used some heirloom gold perfect pearls on the wax. I then forgot to take any more photos until complete, but I used a spellbinders die 'sprightly sprockets' and some G45 paper, sorry not sure of the name but it included steampunk images. I layered these up with some metal embellishments. The numerals are prima mechanicals and although I did have a whole set of large numerals, I wanted to use a few small ones as I just thought it looked better. (the 11 and 12 are a 9 backwards and a 10 and 2 together if that makes sense).
Once they were all stuck down with matte medium I dry brushed with a mixture of little black dress and chocolate pudding over the paper and embellishments to tone them in without totally covering them.


Some of the underneath colour shows through


Detail of grunge paste impression and die cuts


 Lastly treasure gold in indigo, spanish topaz, onyxite and renaissance were used, each over certain areas to finish. The only thing I couldn't change was the shape, though I did toy with extending cogs out of the top and using some metal wings I had, but decided that with all the other additions the shape worked as it is.
Thanks for stopping by, hope you have a lovely day crafting if you can.