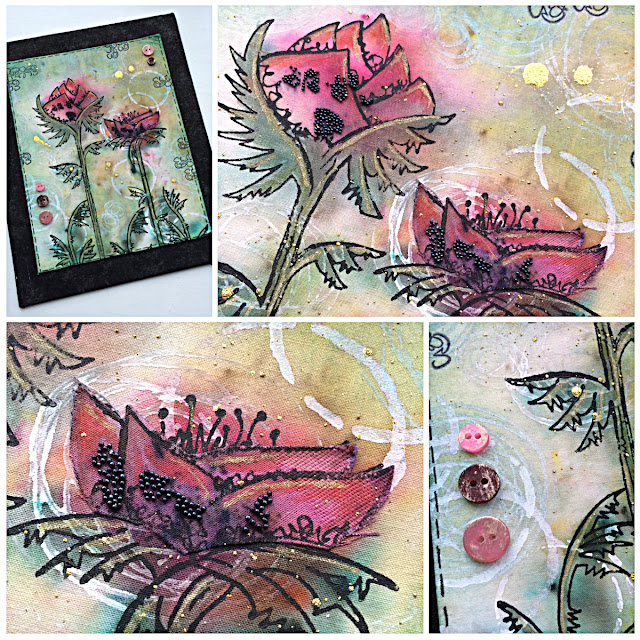
Hi everyone, firstly thanks for all the encouraging comments about my first video! Lovely to hear such positive feedback. I have an inspiration post this morning over at Stamps and Stencils.I've been using infusions with fabric and created a small fabric plaque using one of the new JOFY stamps. Hope you'll hop across and see what I've been up to.
Hi everyone, I've been playing with Lin's new stamps again and have created a few more samples...and as they are fairly simple and quick, I've made my first video tutorial!
As there are a few samples to share, it's about 10 minutes long so if you've got the time grab a cuppa and enjoy.....all feedback and comments welcome.
Close ups and finished cards
Stamping in watering can archival ink, gold paint, and the embossing powder is gold sparkle
All of the large stamps work so well as a base for collaging the smaller stamps onto.
So simple and quick
'Inspire' works just as well with the leaves as it did with the butterflies in my last post...
...and yes it is probably my favourite.
Thanks so much for dropping by, not sure how long before my next video, it does take a bit of work especially when you are learning from scratch and filming on a makeshift tripod that looks very Heath Robinson! Have a lovely creative time whatever you are doing.
Hi everyone, well just a bit excited as the launch of fabulous new products over at PaperArtsy continues this week and tonight it's time to share the gorgeous new collection of Lin Brown.Feeling very, very lucky as I got the opportunity to be a wing man... and alongside the oh so talented Kath Stewart....no pressure then! Enough of me being a giddy kipper, lets get on and show you the video to whet you're appetite.
So a lot to share...they are truly fabulous stamps to work with and I really wanted to show you how versatile these sets are so first up is 'Live Today' using ELB 31.
The colour palette we used from the PaperArtsy Fresco chalk acrylic paint range were Antarctic, Lake Wanaka, South Pacific, Granny Smith, Tango and Toffee, so I matched my archival inks to them. I often use more than one colour of ink on a stamp and if you're careful you won't contaminate the pads. I couldn't decide on the orientation of the card at this stage but either way would work.
Next I used double sided tape to create homemade washi tape. Use your finger to paint a short strip with your chosen colour and then stamp randomly in archival ink using the background stamps. A quick waft with a heat gun will set the ink.
I also used some card that I'd stamped, stencilled and painted when I was first playing with the stamps but it didn't make it to an end product, nothing is wasted though and it's all part of the play.
Paint some smoothy stamping card with Tango, South Pacific and Granny Smith, dry and then stamp in black archival ink before using clear embossing powder. Whilst the powder is till warm I burnished on a little gold foil in a few areas before cutting out the leaves.
I then mounted them on foam pads and added the words which I'd edged with ink.
Next up 'Inspire', a tag using ELB 32. I'm still keeping it clean and simple and used a style I've been exploring and enjoying that you may recognise from my recent work.
Instead of mark making with ink I've built my 'scaffold' using the background stamps and black archival ink.
Next I swiped paint in Tango and South Pacific down and across, drying them in between to avoid making mud. Glue strips of book text across and then more stamping - some in snowflake paint and some using white embossing powder. To finish the background I added a sprinkle of shabby white embossing enamel although splattering with gold and white fresco paint would also work.
To finish the butterflies were stamped in two colours of archival and clear embossed, adding a little gold embossing powder as well. The word is also embossed in two tone ink.
Time to get painty with 'Miracles' using ELB 33, and stencil PS043
Starting with a piece of smoothy card stock, I brayered on Antartic, Snowflake and touches of Granny Smith and Lake Wanaka paint. I then spread clear embossing paste through the leaf part of the stencil.
More brayering, lots of stamping and drips.
Repeat stamp the leaves in two tones of archival before clear embossing and trimming. The quote is stamped in archival and clear embossed as well to make it pop. To finish curl and shape the leaves before adhering with some 3d gel and a sprinkle of shabby white embossing enamel.
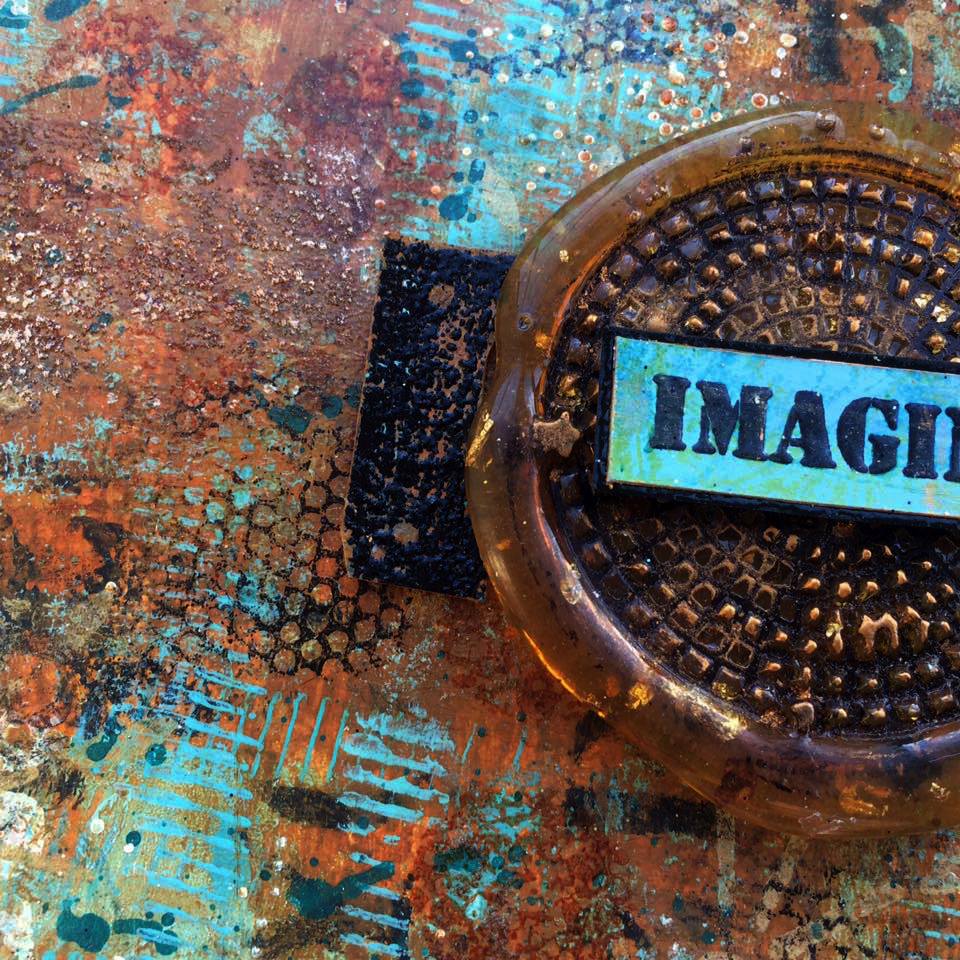
Last but not least I'm going totally grungy, it's 'Imagine' using ELB 34 and all the stencils including PS044 and PS045
All about the layers, lots of brayering and stamping...
...and stencilling...
..more brayering, stamping and stencilling...
...a little sanding and knocking back...
...stamping and embossing using vintage photo powder. Hoping you can see the layers and texture here.
The embellishment is clear UTEE to which I've added some gilding flakes before stamping into. A little treasure gold just lifts it and I just had to use the hinge.
A long post but there was so much to get through! I do hope you've been inspired and please do hop across to Lin and Kaths blogs (links at the beginning) where you'll find how they've used them in their own unique, gorgeous style to create some truly stunning artwork.
These really are versatile stamps and stencils, absolutely loved using them and so honoured to have been asked by Lin....just can't wait to use them more.
Happy New Year to you all, I'm kicking off the first challenge of the year over at Stamps and Stencils and I've chosen Swirls, Whirls and Flourishes! There are such a variety of stencils, stamps, embellishments in these designs and they are so versatile that I thought it would be fun to incorporate them somewhere in a creation of your choosing. I've had some chipboard flourishes for a while and chose to incorporate them in a little canvas I'm going to have sitting on my craft space. This year I'm going to keep positive by looking for the Joy in things.
Very grungy...a bit like January really, except there is some bling if you look closely and lots of texture .
I started off with a small 7 x 5 canvas that I added some mod roc or plaster bandage to the edges. Using Teresa Green and Chartreuse fresco paints I lay some colour onto the background.
I've added stamping and used a flourish stencil with embossing and grunge paste. Some prima blooms drips in Teal were added.
A little crackle paste was added and then I started to alter the mdf shapes, a little while later I've added micro beads, glitter, drips of watercolour... I also used a green and a raw umber glaze letting it seep into the cracks before wiping back. Basically I just had fun adding and taking away. Although I liked the monochrome palette I decided a little contrast was needed in purple.
I'm always surprised how things turn out, rarely anything like I originally thought...they evolve and I guess that's the beauty and yes the joy of creating.
Thanks so much for stopping by, I do hope you'll be able to join in with our challenge and please do hop across and see what the DT have created to inspire you, there really is some yummy eye candy!